Best Tips About How To Draw Fibonacci Arc

Fibonacci Arcs - Timetotrade
How To Use Fibonacci Arcs - Binaryoptions.net

Fibonacci Arcs | Marketvolume.com

How To Draw Fibonacci Arcs Like A Pro - Youtube
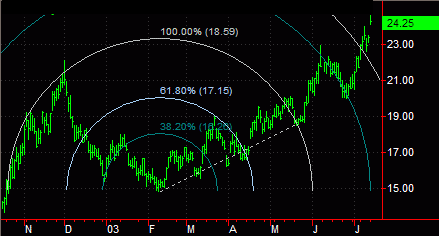
![Fibonacci Arcs [Chartschool]](https://school.stockcharts.com/lib/exe/fetch.php?media=chart_analysis:fibonacci_arcs:farc-1-hdexam.png)
Fibonacci Arcs [chartschool]

Their radii are based on fibonacci ratios.
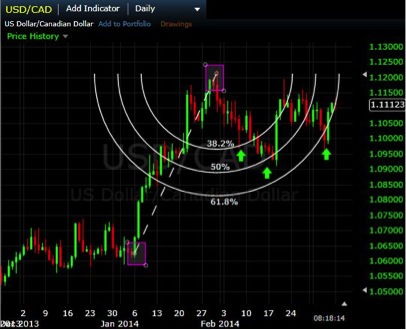
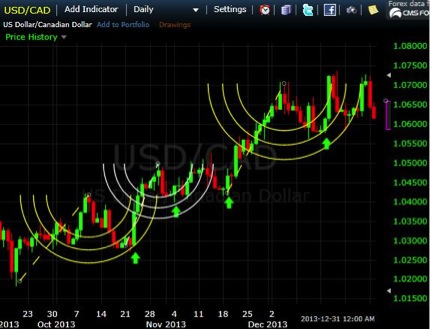
How to draw fibonacci arc. (see below) to do this, we need two extremes (high and low in the given period within a trend) and connect them with a line. Similar to other fibonacci tools the tool connects a swing high and swing low, which then creates series of arcs. These two points should be between a clear peak and trough on the chart.
Place a fibonacci grid from low to high in an uptrend and high to low in a downtrend. That is drawn like usual fibonacci retracement levels. Change percentages, toggle any of the levels on/off, etc.(3).
This is how you draw a negative fibonacci retracement that first reacts off the 61.8% fibonacci retracement before dropping beyond point 2 (the ending point). The first step is drawing a trend line between the high and low points of a trend. A fibonacci arc is constructed by first drawing a trend line between two swing points on a chart.
The key really is to hav. Click on the line for the drop down menu and choose edit to change the default levels(2). The fibonacci arc is drawn directly on the chart.
Move your compass point to the origin position marked with the dot and draw a curve two blocks wide as shown. To add a fibonacci arc annotation to a chart, call the fibonacciarc () method of the annotations () object. Then arcs are created and intersect the trend/speed line at the selected distance percentages between the.
Click and drag line to move entire. Move your compass point to the third origin position shown and draw a curved. Set the grid to display the.382,.50,.618, and.786 retracement levels.

Fibonacci Arc - Fxcodebasewiki
/dotdash_Final_Fibonacci_Arc_Definition_and_Uses_Jun_2020-01-9481554f68a7423c875441060e68f328.jpg)
Fibonacci Arc Definition And Uses

Definitive Guide For Day Trading Fibonacci Arcs | Tradingsim
Definitive Guide For Day Trading Fibonacci Arcs | Tradingsim
Fibonacci Arc - Fidelity
Fibonacci Arc - Fidelity
![Fibonacci Arcs [Chartschool]](https://school.stockcharts.com/lib/exe/fetch.php?media=chart_analysis:fibonacci_arcs:farc-4-clfbull.png)
Fibonacci Arcs [chartschool]
Fibonacci Speed/resistance Arc Drawing Object
How To Use Fibonacci Arcs - Binaryoptions.net

Fibonacci Trading With The Circle, Fan And Time Zone -
![Fibonacci Arcs [Chartschool]](https://school.stockcharts.com/lib/exe/fetch.php?media=chart_analysis:fibonacci_arcs:farc-2-hdexam.png)
Fibonacci Arcs [chartschool]
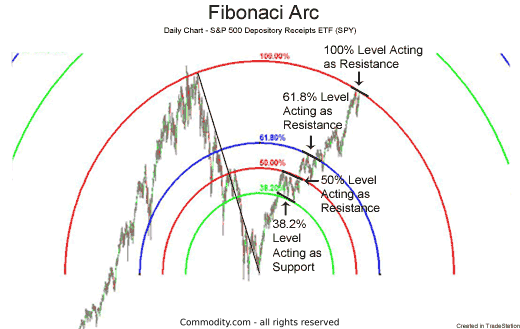
Fibonacci Arcs: How Traders Use This Technical Analysis Tool - Commodity.com
